
| 일 | 월 | 화 | 수 | 목 | 금 | 토 |
|---|---|---|---|---|---|---|
| 1 | 2 | 3 | 4 | |||
| 5 | 6 | 7 | 8 | 9 | 10 | 11 |
| 12 | 13 | 14 | 15 | 16 | 17 | 18 |
| 19 | 20 | 21 | 22 | 23 | 24 | 25 |
| 26 | 27 | 28 | 29 | 30 | 31 |
Tags
- OAuth
- 비동기
- oauth2
- java
- 권한
- spring boot
- Spring
- 페이징
- tomcat
- RabbitMQ
- 스프링 부트
- jvm
- Refactoring
- 페이스북
- clean code
- 시큐리티
- 리팩토링
- apache
- 클린코드
- Producer
- JWT
- 스프링
- Security
- GC
- JPA
- load balancing
- assertj
- g1
- 스프링부트
- gdg
Archives
- Today
- Total
허원철의 개발 블로그
Spring Boot - Security 본문
이번 게시물은 spring boot + jpa + security 에 대한 글입니다.
이 자료를 많이 참고 하였습니다.
1. Gradle 설정
2. Password 객체 등록
3. Entity 와 Repository 생성
4. security config 설정
5. userDetailsService 추가
6. 회원가입 및 로그인
1. Gradle 설정
- 이전 게시물과 비교해 보면 security 라는 것이 추가 됩니다.
dependencies {
	compile('org.springframework.boot:spring-boot-starter-data-jpa')
	compile('org.springframework.boot:spring-boot-starter-security')
	compile('org.springframework.boot:spring-boot-starter-web')
	compile('org.projectlombok:lombok:1.16.10')
	compile('mysql:mysql-connector-java:6.0.4')
	testCompile('org.springframework.boot:spring-boot-starter-test')
}
2. PasswrodEncoder 객체 등록

3. Entity 와 Repository 생성
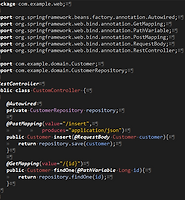
1) Entity 생성
- userId 가 아이디로 사용될 것이며, userPassword 가 비밀번호로 사용될 것 입니다.

2) Repository
- userId 를 찾는 메소드를 선언 해줍니다.

4. security config 설정
- WebSecurityConfigurerAdapter 를 상속 받는 SecurityConfig 를 만들어 줍니다.
	@Override
	protected void configure(HttpSecurity http) throws Exception {
		http
			.authorizeRequests()
/* 1 */			.antMatchers("/**")
				.permitAll()
			.and()
/* 2 */		.formLogin()
				.usernameParameter("userId")
				.passwordParameter("userPassword")
				.loginProcessingUrl("/customLogin")
				.defaultSuccessUrl("/")
				.permitAll()
			.and()
/* 3 */		.logout()
				.logoutUrl("/customLogout")
				.logoutSuccessUrl("/")
				.invalidateHttpSession(true)
				.permitAll()
			.and()
/* 4 */		.csrf().disable()
			;
	}
1) authorizeRequests 밑으로 antMatchers 들을 통해 url 에 대한 권한을 부여할 수 있습니다.
2) formLogin 밑으로로그인에 대한 설정(파라미터, url, 핸들러 등등) 할 수 있습니다.
3) logout 밑으로 로그아웃에 대한 설정(url, 세션, 쿠키 등등)을 할 수 있습니다.
4) csrf CSRF 공격에 대해 방어 하고 토큰을 보낼지 여부.
5. userDetailsService 추가
1) userDetailsService 를 구현하는 클래스를 만들어줍니다.

2)
① 추가적으로 4번에 userDetailService를 등록 해주고 암호화를 걸어준 뒤,
② resources 파일들은 해당이 안되게 설정을 해줍니다.
①

②

6. 회원가입 및 로그인
1) 회원가입


- 암호화된 비밀번호가 추가 된 것을 볼 수 있습니다.

2) 로그인
- /customLogin 에 파라미터 값을 보내봅니다.

'web' 카테고리의 다른 글
| Spring Boot - Rest (414) | 2016.12.04 |
|---|---|
| Spring Boot - Security OAuth2 (384) | 2016.12.04 |
| Spring Boot - Validator (424) | 2016.12.04 |
| Spring Boot - Data JPA (438) | 2016.12.04 |
| Spring Boot - Base (459) | 2016.12.04 |
'web' Related Articles
more


Comments