| 일 | 월 | 화 | 수 | 목 | 금 | 토 |
|---|---|---|---|---|---|---|
| 1 | 2 | 3 | 4 | |||
| 5 | 6 | 7 | 8 | 9 | 10 | 11 |
| 12 | 13 | 14 | 15 | 16 | 17 | 18 |
| 19 | 20 | 21 | 22 | 23 | 24 | 25 |
| 26 | 27 | 28 | 29 | 30 | 31 |
- tomcat
- oauth2
- spring boot
- load balancing
- jvm
- 비동기
- 권한
- clean code
- 페이스북
- 스프링
- GC
- assertj
- JWT
- 스프링 부트
- RabbitMQ
- gdg
- Spring
- g1
- 페이징
- OAuth
- Security
- Producer
- Refactoring
- 시큐리티
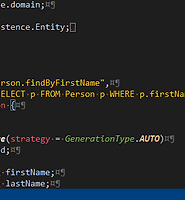
- JPA
- 스프링부트
- 리팩토링
- apache
- java
- 클린코드
- Today
- Total
허원철의 개발 블로그
Spring Boot - Security OAuth2 본문
이번 글을 spring boot 에 security OAuth2 를 다룬 글 입니다.
최근, 웹 또는 앱에서 가장 많이 접하는 인증 형태가 바로 OAuth2 형태입니다.
예를 들면, 페이스북 인증, 구글 인증, 다음 인증, 네이버 인증 등 이 될 수 있습니다.

1. Gradle 설정
2. Properties 설정
3. Application 설정
4. Controller 설정
5. 테스트
5. DB 연동
1. Gradle 설정
- security 에서 spring-sesurity-oauth2 를 추가 선언 해줍니다.
dependencies {
	compile('mysql:mysql-connector-java')
	compile('org.springframework.boot:spring-boot-starter-data-jpa')
	compile('org.projectlombok:lombok')
	compile('org.springframework.boot:spring-boot-starter-security')
	compile('org.springframework.security.oauth:spring-security-oauth2')
	compile('org.springframework.boot:spring-boot-starter-web')
	testCompile('org.springframework.boot:spring-boot-starter-test')
}
2. Properties 설정
security.user.name=root
security.user.password=wonchul

security.oauth2.client.client-id=wonchul
security.oauth2.client.client-secret=wonchul

spring.datasource.driver-class-name=com.mysql.jdbc.Driver
spring.datasource.url=jdbc:mysql://localhost/test
spring.datasource.username=
spring.datasource.password=

spring.jpa.hibernate.ddl-auto=create
spring.jpa.generate-ddl=false
spring.jpa.show-sql=true
- user.name 의 default 값은 user 이고, user.password는 실행 시 랜덤 값이 나오게 됩니다.
- client-id 와 client-secret 또한 랜덤값이 나오게 됩니다.
- 위와 같이 설정함으로 써, 고정이 됩니다.
3. Application 설정
- @EnableResourceServer : API 서버 인증(권한 설정)
- @EnableAuthorizationServer : OAuth2 인증 서버를 활성

- header 가 충돌 날 수 있기 때문에
@Override
public void configure(HttpSecurity http) throws Exception {
   http.headers().frameOptions().disable();
   ...
}
이 부분을 추가해주고 모든 응답을 인증 후, 가능 하게 합니다.
4. Controller 설정
- Controller는 간단합니다. 응답이 왔을 때, "Hello, Spring Boot Oauth2" 라는 문구가 나오는지 테스트 해보기 위해 만들었습니다.

5. 테스트
- 인증없이 통신 요청을 하게되면 아래와 같이 401 코드와 같이 나오게 됩니다.

- 인증을 해보자.
1) Authorization -> Type (OAuth 2.0) 선택
2) Get New Access Token 으로 토큰을 발급 받을 수 있는 창이 띄워집니다.

3) 위와 같이 입력을 하게 되면 wonchul 이라는 이름으로 token 이 만들어집니다.
4) 이름을 클릭 후, token을 header 나 url 로 사용할지 선택합니다.
5) use token을 한 뒤, 다시 url 요청을 합니다.

위와 같이 토큰을 넣고 요청 하면 "Hello, Spring Boot Oauth2" 를 볼 수 있습니다.
6. DB 연동
- DB 연동도 간단합니다. spring-security-oauth 에서 지정해야할 table도 있고 query 를 통해 토큰도 입력되고 할 수 있습니다.
@Bean
public JdbcTokenStore tokenStore(DataSource dataSource) {
	return new JdbcTokenStore(dataSource);
}
- Application에 JdbcTokenStore를 Bean에 등록 해줍니다.
※ 참고 : https://brunch.co.kr/@sbcoba/1
'web' 카테고리의 다른 글
| lonic Framework - Angular (421) | 2016.12.04 |
|---|---|
| Spring Boot - Rest (414) | 2016.12.04 |
| Spring Boot - Validator (424) | 2016.12.04 |
| Spring Boot - Security (388) | 2016.12.04 |
| Spring Boot - Data JPA (438) | 2016.12.04 |